Monday, May 20, 2013

Interfacing to the PandaBoard GPIO, SPI, etc...


Here is my experience/adventure with PandaBoard trying to use its SPI, GPIO interfaces.
This is a work in progress so, I am documenting as I progress.

GPIO are found @
/sys/class/gpio
and then need to export as root...
#echo "50" > export
# echo "39" > export
# echo "38" > export
# echo "37" > export
# echo "out" >  gpio51/direction
# echo "out" >  gpio50/direction
# echo "out" >  gpio39/direction
# echo "out" >  gpio38/direction
# echo "out" >  gpio37/direction

# echo "1" > gpio38/value
# echo "0" > gpio38/value
# echo "1" > gpio38/value
# echo "0" > gpio38/value
# echo "1" > gpio38/value
# echo "1" > gpio37/value
# echo "0" > gpio37/value


To read from GPIO that is set as Input:
# cat /sys/class/gpio/gpio34/value

I will need to use 
chmod 666 /sys/class/gpio/gpio38/value
OR
Change the rc.local  

Now, How do I do this from C program:
This file will show in details how to do all the above from C program.
Note: You will have to run this program using sudo ./Test_IO_1 until I find how to create the GPIO on boot and make it accessible to all users
Makefile
Test_IO_1.c
I included the Makefile so you can compile the C program.  I compiled the code natively, which is on the Pandaboard itself.

  1. Make a folder, Test_IO_1
  2. Copy these two files to the new folder
  3. run make
  4. you should have Test_IO_1.0 and Test_IO_1
  5. type sudo ./Test_IO_1
  6. monitor GPIO38 with a scope, multimeter or a LED

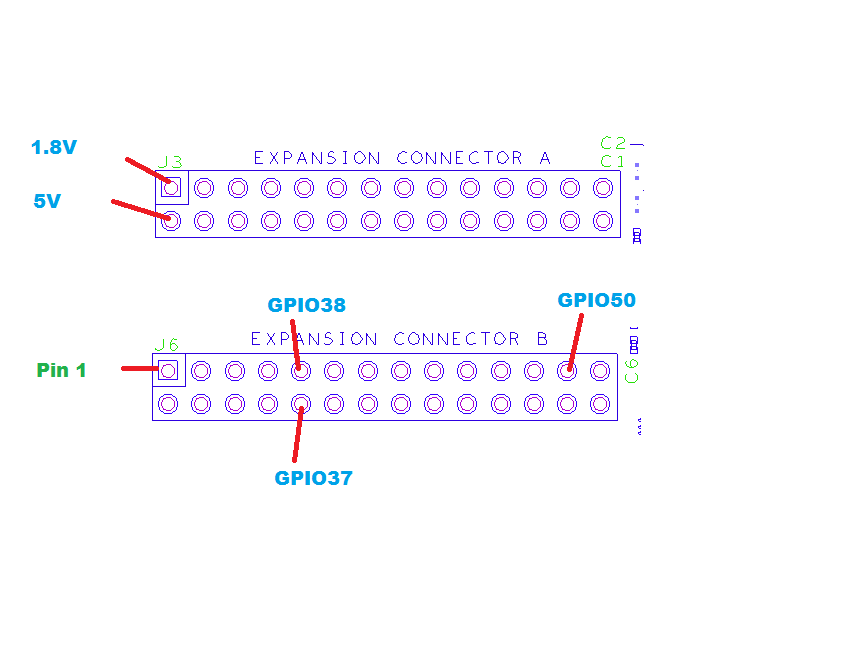
Use this image or PandaBoard datasheet to find the correct pin for GPIO38

Open a file-socket to read or write from /sys/class/gpio/gpio38/value

To Read:
rewind(fp);
fread(&read_value, sizeof(char), 1, fp);

To Write:
rewind(fp);
fwrite(&set_value, sizeof(char), 1, fp);


OK, How to modify device read/write permission on boot:
I found this tile /etc/mtab
is this the one?


Also, I found SPI stuff @
/sys/class/spi_master
There is spi1, spi2, spi3, spi4


References:
http://lxr.free-electrons.com/source/Documentation/gpio.txt
http://www.haifux.org/lectures/258/gpio_spi_i2c_userspace.pdf


https://www.kernel.org/doc/Documentation/spi/spi-summary


http://www.youtube.com/watch?v=fuEB0VCkslQ
http://comments.gmane.org/gmane.comp.embedded.pandaboard/9743
http://lxr.free-electrons.com/source/drivers/input/keyboard/gpio_keys.c


http://lxr.free-electrons.com/source/arch/arm/mach-u300/spi.c?v=2.6.34
http://elinux.org/BeagleBoard/SPI

http://www.egr.msu.edu/classes/ece480/capstone/fall12/group02/documents/Mark-Birdsall_App-Note.pdf


Wednesday, May 15, 2013

Run archlinux on PandaBoard Step by Step

Working on installing archlinux on my PandaBoard I found this site with great information,
Archlinux ARM


But, I had to do a lot of research to find more stuff I needed to actually follow these instructions.
So, I decided to document all that and add a little more to help others if they needed.  So, this is a work in progress and will be updated as I work and add to my PandaBoard.

I am running this process on Ubuntu 13.04...

You need to get these packages
PandaBoard Bootloader Tarball   will be extracted in the FAT partition
Root Filesystem Tarball                will be extracted in the ext3 partition

Use the script provided by archlinuxarm.org xmkcard.sh from the bootloader tarball to partition and format the SD Card.
You need to make the script file executable
chmod +x xmkcard.sh

Make sure you find out the name of the SD card in the dev folder
ls /dev/sd*
ls /dev/mmc*

and you can also use mount to see what name it has when it was mounted

Now you can run
sudo ./xmkcard.sh /dev/sd_name

You need to expand the two tarballs, downloaded above, one to the FAT and the other one to the ext3
Wait:
To extract the files you will need to use this command
tar -zxvf  filename.tar.gz

And you need to be root, not sudo as some files need to be created as part of the filesystem and you have to be root.

So, recent releases of Ubuntu come with root account disabled, to enable it
sudo passwd root
This will enable the root account and will ask you to set a password

and if you want to disable the root account

sudo passwd -l root

About creating boot.scr file:
This one you will need to have mkimage executable and I am still looking for it...
So, I found out that you need to install uboot-mkimage

sudo apt-get install uboot-mkimage

Now you should be able to create the boot.scr file use this command for reference
First, Create a file bootcmd  and add this to it
fatload mmc 0 0x80300000 uImage setenv bootargs console=ttyO2,115200n8 noinitrd init=/sbin/init root=/dev/mmcblk0p2 rootwait rw loglevel=8 bootm 80300000

Then type this command:
mkimage -A arm -O linux -T script -C none -a 0 -e 0 -n "PandaBoard boot script" -d bootcmd boot.scr

And now, you should have the boot.scr file in the same folder of the bootcmd file, move it to the FAT partition.


Now, take your SD Card and plug it into the PandaBoard and power it up:
Make sure you connect a serial cable to the DB9 connector for output and you will see and be able to login via the terminal if you needed to, I will include a text file with a capture of all text output

PandaBoard_Debug_Out.txt


First thing you will need is to login,
username is : root
password is: root

If you need to change root password,
Type: passwd  after you login and you will be prompted to enter new password.
If you need to add new user so you do not login with the root
Type:     useradd user_name
Then change password:  passwd user_name
where user_name is the new user name you want to create

You will need to install sudo to be able to use root privilege with your new user id

How to update System in archlinux
We use pacman to install/update the system packages
So, type pacman-key --init to create pacman key first
you might need to switch to another console and type
ls -R / && ls -R / && ls -R /
now, when it is done, type pacman -Syu to update the system
It will take some time and will download and update your system
To add/install packages use pacman -S package_name

How to add your username to suders
Install sudo, modify visudo

  1. Install adduser by using pacman -S adduser
  2. Type  adduser username

and follow/answer all questions, set defaults, set password...
Now we need to edit the visudo to allow new user to use the sudo command
Type
EDITOR=nano visudo


Change hostname
Hostname is stored in the /etc/hostname file
type
sudo nano /etc/hostname
Then edit the name to the one you prefer, save and exit
Now, you will need to edit the hosts file in the same directory
sudo nano /etc/hosts
edit the like that starts with 127.0.0.1 localhost.localdomain localhost
and add your new hostname to the end
127.0.0.1 localhost.localdomain localhost New-Hostname

Install Xserver
sudo pacman -S xorg lxde xorg-twm xorg-xclock xterm xorg-xinit
> create file ~/.xinitrc in your home directory and add this line to it
exec startlxde
> there was an error not finding a cache file and I had to create it manually
OK, the file name was cookie and this is what I did
cd .config/pulse
echo > cookie
The echo command created a file cookie then I had to use nano and add the line I mentioned above
Now you should be able to use startx and get your LXDE desktop


List of items to add:
system update
network
keep boot messages on display


For reference:
Use e2label /dev/sdx1 label_name to change your partition label
Use mkfs.ext3 /dev/sdc2 to format ext3 your partion
to view your board IP address use ip add show

OK, for administration stuff:
these are files I will need to know what they do...
login.defs           login and account information
mtab
iftab                 something with network
fstab


Creating boot scripts:
/etc/profile.d/locale.sh   works, but permission denied!!!


References Used:
Archlinux ARM

http://elinux.org/ArchLinux_Install_Guide
https://wiki.archlinux.org/index.php/Beginners'_Guide


https://wiki.archlinux.org/index.php/LXDE

https://wiki.archlinux.org/index.php/Bluetooth
https://wiki.archlinux.org/index.php/Wireless_Setup


Friday, May 3, 2013

How to Auto scroll TextView Android Java

I listed how to auto-scroll text containers in C# while ago, and now that I am developing other applications for Android, I needed to do the same for the following:

TextView:
Rx_text is a TextView Container.  and O_Text is a variable of type String


Rx_text.append(O_Text);
Rx_text_scroll_view.scrollTo(0, Rx_text.getBottom());


Thursday, May 2, 2013

How to Auto scroll TextBox, ListBox, ListView C# C-Sharp


Programming In C# with Visual Studio


Sometimes you need to add this little trick in your code to ease using it. this trick is to force the TextBox, ListBox, ListView, or DataGridView to scroll down to the last item was entered.


Here are some info on how to do an Auto-scroll for your program controls

TextBox auto-scroll

textBox1.SelectionStart = textBox1.Text.Length;
textBox1.ScrollToCaret();

ListBox auto-scroll

listBox1.SelectedIndex = listBox1.Items.Count - 1;
listBox1.SelectedIndex = -1;

ListView auto-scroll

listView1.EnsureVisible(listView1.Items.Count - 1);TreeView autoscroll
treeView1.Nodes[treeView1.Nodes.Count - 1].EnsureVisible();

DataGridView auto-scroll

dataGridView1.FirstDisplayedCell =
dataGridView1.Rows[dataGridView1.Rows.Count - 1].Cells[0];