Saturday, July 23, 2016

Connect Raspberry Pi to Hidden SSID

I needed to connect my Raspberry Pi to a hidden SSID, and I did it using the following steps and resources...
These are the steps I followed to get my Raspberry Pi to see my hidden SSID.


Install iwlist

sudo iwlist wlan0 scan essid *yourSSID*

once you see the network Access Point, go to your wifi and find it listed, add it and enter your password/key


now, you are connected.


If you are working from the console screen and do not load Xwindow...

sudo nano /etc/network/interfaces

Edit the file and add/update these informaiton

allow-hotplug wlan0
auto wlan0
iface wlan0 inet manual
    wpa-conf /etc/wpa_supplicant/wpa_supplicant.conf
Now, you need to edit this file
 sudo nano /etc/wpa_supplicant/wpa_supplicant.conf
Enter/Add the ssid information

network={
        ssid="ssid-name"
        psk="ssid-password"
        key_mgmt=WPA-PSK
}
For key_mgmt, you need to find out what type it is, usually it is WPA-PSK

Reference:
https://www.raspberrypi.org/forums/viewtopic.php?&t=37119


Thursday, April 7, 2016

Raspberry Pi 3 How to Use Serial Port

Here is my work summery on the Raspberry Pi 3.  As I start working on it and putting it all together, this efforts are made to collect all the information I need, it is wise to save all my work notes.

So, first of all you should have the following items on your desk to start working on the Raspberry Pi:
I like this image from Element 14 Community.


I am done writing all the drivers and some apps that use I2C, SPI, GPIO, and other resources on the board. so, I will be updating this page soon.

Setting up the RaspberryPi:
to start here is the ID and password for the default user
ID: pi
Password: raspberry


Serial port:
So, on the Raspberry Pi 3 and other too, the serial port is used for the consol out put.  that is not going to work if we are trying to use it for our designs.  So, the first thing is to stop the consol from writing to the port and freeing it for us to use.
In Raspberry Pi there is a tool called Raspberry Pi Configuration.  you can start this tool by clicking Menu-> Preference, then Raspberry Pi Configuration.
Now, in the second tab, Interfaces, click on disable next to Serial.  Clock OK and restart the Pi.

Important:  Serial port on Raspberry Pi 3 is called /dev/serial0.  So if you try to use the /dev/ttyAMA0 or any other name it will not work.

Using minicom or potty applications you can test port
connect pin GPIO14 and GPIO15 to make a loop back, so if you type any character in the terminal you should see it.  If the connection between GPIO14 and GPIO15 is missing you should not see any characters on the screen.

Sample code to use to configure/interface to the serial port:


Saturday, May 9, 2015

Raspberry Pi How to


Here is my work summery on the Raspberry Pi.  As I start working on it and put it all together, this efforts are made to collect all the information I need, it is wise to save all my work notes.

So, first of all you should have the following items on your desk to start working on the Raspberry Pi:
I like this image from Element 14 Community.


I am done writing all the drivers and some apps that use I2C, SPI, GPIO, and other resources on the board. so, I will be updating this page soon.

Setting up the RaspberryPi:
to start here is the ID and password for the default user
ID: pi
Password: raspberry


GPIO:
There are at least two options to work with GPIOs. One is mapping a pointer to the GPIO registers and using that to manipulate IOs. Two is to use file system by opening the proper file and manipulating that.

Note:
There is a change on Raspberry pi 2 that affected the addressing of GPIO address, originally the following mapping was used on the Raspberry pi
#define BCM2708_PERI_BASE        0x20000000   
#define GPIO_BASE                (BCM2708_PERI_BASE + 0x200000)  
/* GPIO controller */

the following change will be used to map to the new Raspberry pi 2
#define BCM2708_PERI_BASE        0x3F000000  
#define GPIO_BASE                (BCM2708_PERI_BASE + 0x200000) 
/* GPIO controller */


I2C:

Will need to install:
sudo apt-get install libi2c-dev
sudo apt-get install i2c-tools

Then you will be able to run:
sudo i2cdetect -y 1
i2cget
i2cset

Now, How to read/write to I2C:


SPI:
Great news, SPI is functioning now, I am working on learning more about the process and customizing the code to work with my need as a general SPI master that can communicate with different SPI resources.


Read and Write files on micro SD Card
You can read/write files on the SD card or on a mounted USB Flash drive.
to do, you need to know first the mount point for this device.


Sound:


How to sync time with NTP server on login:
We need to edit the NTP time server list.
well, the command is
ntpdate ntp_server_address
but, I found out on the Rasspberry pi I get this message
the NTP socket is in use, exiting
So, I need to do this
sudo service ntp stop
sudo ntpdate ntp_server_address
sudo service ntp start
and now it works just fine....
You can test to see if ntpd is running,
ntpd -p
Also, need to select your proper time zone:
need to remove the timezone file first
rm localtime
now link to the correct file for your time zone
cd /etc
ln -s /usr/share/zoneinfo/US/Eastern localtime
Now when you sync it will show the correct time for your zone.


Start App automatically on boot:

to be able to run a script automatically after login, we need to edit the following file
sudo nano /etc/profile
then add the executable at the end of this file such as the commands needed to automatically execute ntp sync at login
sudo service ntp stop
sudo ntpdate ntp_server_address
sudo service ntp start

There is also cron:
cron is a software utility that is time based to run scripts in a Linux like environment.
crontab is cron table that contains all these scripts
a link is provided to read more about cron on Wikipedia web site, very good information


Bluetooth management:
Some more details to be added here once I am finished with it...


Links to resources:


http://askubuntu.com/questions/244526/unable-to-synchronize-time-using-ntp

http://www.opentechguides.com/how-to/article/raspberry-pi/5/raspberry-pi-auto-start.html

http://en.wikipedia.org/wiki/Cron

How to configure your Raspberry pi WiFi and Bluetooth

Saturday, March 14, 2015

Install MplabX On Linux Ububtu 64 Bit

Searched so many answers every time I re-install my Ubuntu, here it is so I never forget or search again,


This is to install the 32bit libraries.  we need these to run MplabX.
sudo apt-get install libc6:i386 libx11-6:i386 libxext6:i386 libstdc++6:i386 libexpat1:i386
Also, we need to install Java SDK or RTE.  Openjdk...
sudo apt-get install openjdk-8-jre  openjdk-8-jdk
Also, I need to mention how to wire the ICD3 to connect to flat connector that would work with PICKIT3.
These are the Pins/Wires Order and numbers:

  1. Blue
  2. Yellow
  3. Green
  4. Red
  5. Black
  6. White


Reference:
http://blog.laczik.org/microchip-mplabx-installation-on-64-bit-ubuntu-system/
http://www.electronic-products-design.com/resources/customer-guides/manufacturing/ibex-microchip-icd2-programming-cable

Wednesday, March 11, 2015

UserControl What a Wonderful Future in C# C-Sharp You should be using

Working on a big project that contains a lot of functionality, modules and futures really gets stressing and gets out of control.  So the best approach is to divide code into modules and structure them to be unique and reusable.


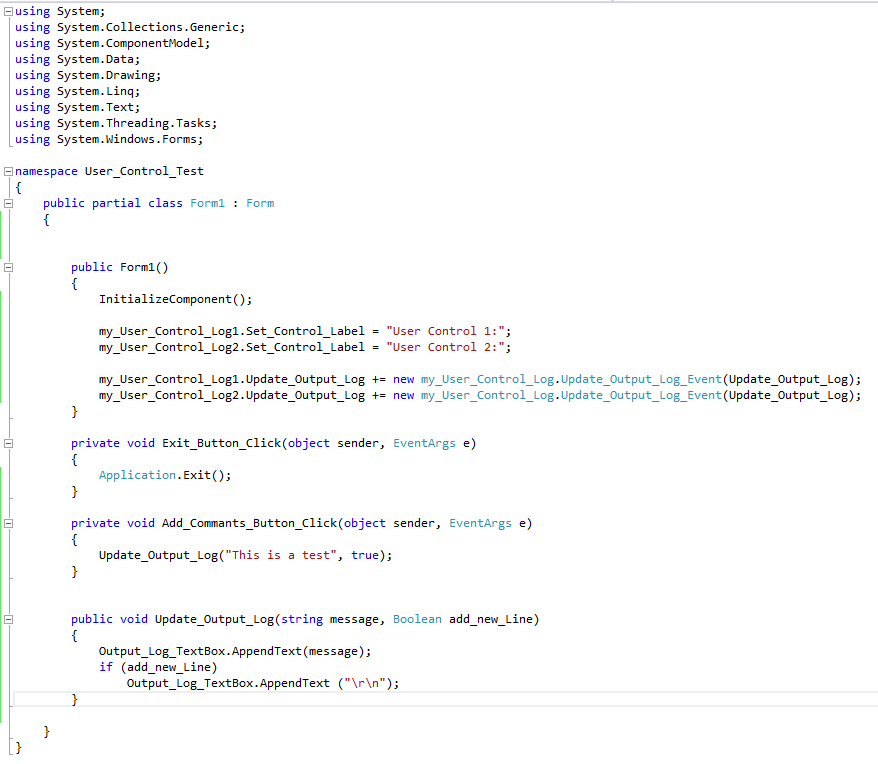
The following is a screen shot or the main application I put together for the example purpose.  It contain a text  box that is displays all output logs.
You can send text logs from "Add Text Test" command button,
you can also, type specific text in the two text boxes and send them to the Output Log Text box.


 I created this user control, a text box and a command button that can be used to type in your text log and press the button to update/send to the main Output Log text box.


Overall Concept

The idea, is when creating main application GUI, you create new user control that can be used later and almost standalone. So it is self contained and can be reused.
The following diagram shows an application that has a text control and three other control groups that consists of a text entry and a command button.
these command buttons can be used multiple times in the same application with different needs and functionality.


The first goal is to create the control group and define events and properties you need to use for this user control. In the user control we using there are:
  • Event that occurs when user clicks on the Command button
  • Properties related to the Text Entry
    • Set: modify the contents of the Text Entry
    • Get: read the contents of the Text Entry
Command Button Events are handled as follow:
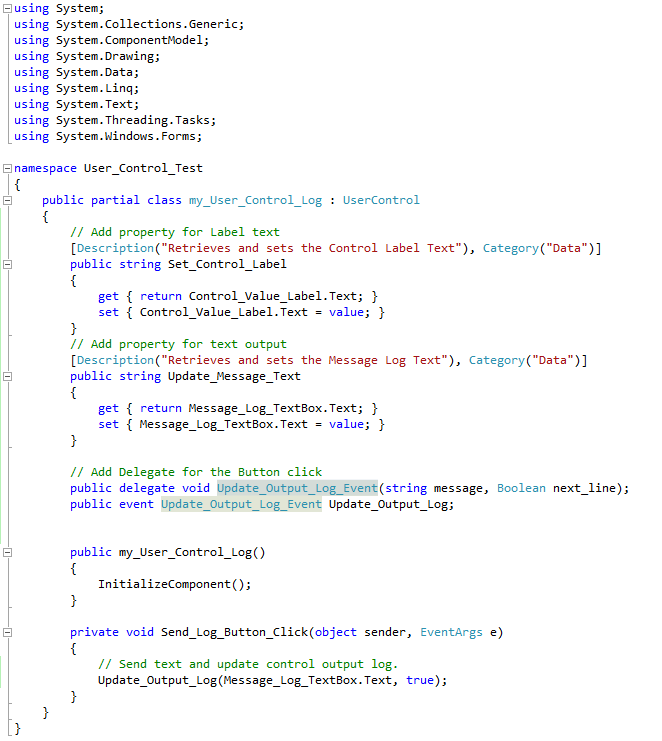
  1. User Control Class:
    1.  Add new public delegate 
      • public delegate void Update_Output_Log_Event(string message, Boolean next_line);
    2.  Create new event of same delegate type 
      • public event Update_Output_Log_Event Update_Output_Log;
    3. In the button click add a call to that event
      • Update_Output_Log(Message_Log_TextBox.Text, true);
  2. Main Application Class
    1. Add the User Control to the GUI of the main form
      • I will rename it my_User_Control_Log1
    2. Create function that has the same parameters as the delegate in User Control
      • public void Update_Output_Log(string message, Boolean add_new_Line)
    3. Register the event to the new function
      • my_User_Control_Log1.Update_Output_Log += new my_User_Control_Log.Update_Output_Log_Event(Update_Output_Log);


Properties are handled as follow:


  1. User Control Class:
    1. Add description and category to make it look nicer!
      • [Description("Retrieves and sets the Message Log Text"), Category("Data")]
    2. Create new variable that represents the data type we need to access
      • public string update_Messsage_Text
    3. Add get and set properties for that variable
      • get { return Message_Log_TextBox.Text; }
      • set { Message_Log_TextBox.Text = value; }
      • These two properties will modify/read from the Text Box Message_Log_TextBox.Text
  2. Main Application Class:
    1. when needed you can set or get text values using the following
    2. Output_Log_TextBox.AppendText(my_User_Control_Log1.Update_Message_Text);
    3. my_User_Control_Log1.Update_Message_Text = "Test New Text...";


Here are all the details on how to do that step by step...


Saturday, March 7, 2015

Linux Copy Files Remotely Over SFTP

Using ssh between systems running Linux and always in need to transfer files back and force...?
Then you should consider using sftp as you will be able to copy files so easy unless you use a GUI application to click, click, click, which is OK and nothing wrong with that.  But, for me I like to feel the move and be in control...

So, sftp has the same commands almost as ssh that connects you to your remote PC.  However, it also has the commands that can run on your local PC.  So, after you login to your remote session, all sftp commands you type should run on your remote session,

If you type ls, then you are listing all commands in your remote session.
Now, type
lls
and you see list of all files in local folder you started from


If you type

  • mkdir xyz   you created folder in your remote PC

now type

  • lmkdir xyz  and you created folder in your remote PC


If you type:

  • pwd  you will list current working directory on remote PC

now type

  • lpwd  you will see your current working directory on local PC


Here are some useful commands that I need to use all the time


  • put puts files from your local working directory to the remote directory
  • get gets files from your remote directory to local directory


All following commands work on remote PC and when you add l, that is lower case L, you run them on local PC

  • lls, ls
  • lpwd, pwd
  • lmkdir, mkdir


Sunday, February 22, 2015

CMIS102 Class Resources

I thought it would be easier to gather all the resources and links I use in my CMIS102 class and post them on one location.  This will be very useful in keeping track of all these resources, updating them and providing only one link to all my students.

Links to Online Compilers IDEs:
http://www.tutorialspoint.com/compile_c_online.php
http://cpp.sh/
https://ideone.com/


Links to Online Flow Chart applications:
https://www.lucidchart.com
www.draw.io


Links to C Coding Resources and Examples:
http://www.programiz.com/c-programming/c-string-examples    String Examples
http://www.programmingsimplified.com/c-program-examples    More programming examples
http://www.programiz.com/c-programming/c-strings                   MOre reference to String Capture


YouTube list of videos:
Introduction to Flowchart 

Thursday, August 21, 2014

Writing C code on Windows using Geany and GNU

I have to provide a simple instruction to install an IDE "Integrated Development Environment" for  my students to be able to work on the assignments on their computers.
After doing a lot of research I found two options, Monodevelop and Geany. They both work great on Ubuntu Linux and have no issues, but, to use them on Windows I started to deal with the unknown...

Working with Monodevelop: monodevelop
Monodevelop will install fine in windows under different name, the issue is it does not support C programming language. At least out of the box. However, I read some blogs stating that we can somehow get it to compile C...  So, this is not what I am looking for and I can not expect my students to waste their time with these hacks at this time.  NOT AN OPTION.
Note:
it works fine on Ubuntu Linux and Mac, so, you can use it fine if this is what you have for Personal Computer...


Working with Geany:  Geany
Geany is a great simple IDE that works on Ubuntu Linux and Windows, as well as Mac.  but it requires the GCC, GNU C Compiler which will need to be installed on Windows.
I came up with the following instructions to help simplify the process of doing that.

Here is a list of download links that will be needed:

  1. Geany download site  Please select"geany-1.24_setup.exe - Full Installer including GTK 2.16."
  2. MinGW "Minimalist GNU for Windows"  Please select "Looking for the latest version? Download mingw-get-setup.exe (86.5 kB)"
Now that you have all required downloads, run both and install by following the default installations.
You should have the following icons on your desktop now,


Now, we will need to setup and install the gcc compiler to be able to compile your C code programs.


  1. Start MinGW by clicking on MinGW Installer shown on your desktop.
  2. you will get the following screen and notice that your list has no items selected in green boxes like my screen shot
  3. Go a head and select the one I have selected, right click and select "Mark for Installation"


    1. mingw-developer-toolkit
    2. mingw32-base
    3. mingw32-gcc-objc
    4. msys-base
  4. Now go to the menu "Installation" , and click on "Update Catalogue"
  5. after the download of needed files and installing them is done, you now have all you need to work on Geany and write your applications, but we need to add the new MinGW to Windows Path...
  6. You will need to go to Control panel
  7. Select System
  8. On the right list click on Advanced System Settings
  9. Now Click on Environment Variables...
  10. You will get this dialog box
  11. find Path  in the System Variables and double click on it
  12. now click on the Variable Value
  13. make sure you are at the end of the text and add the following text  ";C:\MinGW\bin\"
  14. you will be adding everything inside the double quotes
  15. Now, Click on OK and OK again,
  16. when you start Geany and write your own program at this point everything should be all set to compile your new code.


Monday, February 17, 2014

Biasing a Diode Semiconductors

To talk about a semiconductor, we need to talk about a conductor first.
Conductors: such as copper, silver, gold and iron are good materials that allow the flow of electrons through them.
Insulators: such as wood, plastic, rubber and glass are materials that do not allow electrons to flow through them.

Semiconductors such as silicon and germanium are neither good conductor nor good insulators.
A new material that is based on semiconductors is produced by combining two materials in a certain ratio that will have a controllable behavior different than conduct/insulate.

The Diode is the simplest device that makes use of semiconductors and are the base of a very complicated devices such as transistors, Integrated Circuits, Microprocessors.
The idea behind Diodes is that they can control the flow of electrons through them to one direction only.  This is achieved by process called biasing.


There are two types of diode biasing, forward and reverse.  Forward biasing allow the diode in a circuit to conduct and allow electrons to flow in one direction.
However, when the diode is reverse biased it will work as an insulator and prohibit electrons from flowing through it.

Reverse Biasing a Diode, No Current flow

Forward Biasing a Diode, Current Flows in Circuit


The behavior of a diode in a circuit is very similar to a one way valve placed to connect two water pipes.  The valve is a control system that will allow the flow of water through the pipes in one direction only.
This behavior reminds me with the valves in the human hart.  Human heart has four valves that allow the flow of blood ONLY in one direction and never the opposite direction.


References:
http://www.st-andrews.ac.uk/~www_pa/Scots_Guide/info/comp/passive/diode/diode.htm

http://www.allaboutcircuits.com/vol_3/chpt_3/1.html
http://www.chipshow.com/blog/?cat=1
http://www.youtube.com/watch?v=JBtEckh3L9Q

http://www.youtube.com/watch?v=W6QUEq0nUH8

Monday, November 11, 2013

Debian on ODROID-x2

Edit 12/7/2013:
Thanks to mdrjr Mr. Mauro Ribeiro work and help he was able to edit the kernel build and enable the SPI.

So, here are my notes on this work

OFFICIAL Debian Wheezy for X2

www.mdrjr.net/odroid/debian-wheezy

root/odroid
odroid/odroid

network is configured in
/etc/network/interfaces
####################################################
# interfaces(5) file used by ifup(8) and ifdown(8)
auto lo
iface lo inet loopback

auto eth0
iface eth0 inet static
#your static IP
address 192.168.1.50
#your gateway IP
gateway 192.168.1.1
dns-domain example.com
dns-nameservers 192.168.11.1
netmask 255.255.255.0
#your network address "family"
network 192.168.1.0
broadcast 192.168.1.255
####################################################

You might need to add:
sudo apt-get install libncurses5-dev

Update Date on ODROID-X2 board
data -s "Dec 16 00:00:00 EST 2013"


I did the following steps:
  1. I created a folder in my root home
  2. got the web and get:
  3. wget --no-check-certificate https://github.com/hardkernel/linux/archive/odroid-3.8.y.zip
  4. 7z x -y odroid-3.8.y.zip
  5. cd odroid-3.8.y
  6. sync                    This will sync your SD card
  7. make mrproper
  8. make odroidx2_defconfig
  9. make menuconfig  >>>  this one needed to install sudo apt-get install libncurses5-dev  
  10. now which one I used? odroidx2_ubuntu_defconfig  odroidx2_defconfig
  11. had to install bc first, apt-get install bc
  12. make -j8
  13. sync
  14. make -j8 modules
  15. make  modules_install
  16. sync
  17. kernelversion=`cat ./include/config/kernel.release`
  18. sudo mkinitramfs -c gzip -o ./initramfs-$kernelversion $kernelversion
  19. mkimage -A arm -O linux -T ramdisk -C none -a 0 -e 0 -n initramfs -d ./initramfs-$kernelversion ./uInitrd
  20. cp /boot/zImage /boot/zImage.prevc
  21. cp /boot/uInitrd /boot/uInitrd.prev
  22. cp uInitrd /boot
  23. cp arch/arm/boot/zImage /boot
  24. cp .config /boot/config-$kernelversion
  25. cp System.map /boot/System.map-$kernelversion
  26. sync
  27. shutdown -h 0

And it worked, I am running now using my built kernel...

Edit 12/15/2013:
After the last edit to the kernel to enable spidev1.0 I was able to build the kernel and booting to see the /dev/spidev1.0
the problem is the bottom 1/3 of the monitor is not showing that area and only showing garbage!


Reference:

If you need to use your Odroid as a WiFi Hotspot...
http://forum.odroid.com/viewtopic.php?f=52&t=6282


Sunday, September 22, 2013

Read and Write to ttyS0 serial ports in Linux


Two ways to interface to the ttyS0 serial port:

1)  via terminal command line:

echo "ABCDEF" > /dev/ttyS0
cat /dev/ttyS0


To configure the port:
stty -F /dev/ttyS0 speed 9600 cs8
stty -F /dev/ttyS0 speed 9600 cs8 -cstopb -parenb


2) via C Program: minicom
sudo apt-get install minicom
when done use
sudo minicom -s


3) By writing your own app in C++ or C# or any other preferred Programming language:
I will have some sample working programs here soon.

Saturday, September 14, 2013

Installing Eclipse from the website on Ubuntu 13.04

I found these instructions on one of the websites discussions:

If you've downloaded Eclipse from their official website, follow these steps for the installation.
  1. Extract the eclipse.XX.YY.tar.gz using
    tar -zxvf eclipse.XX.YY.tar.gz
    
  2. Become root.
    sudo -i
    
  3. Copy the extracted folder to /opt
    cp -r eclipse.XX.YY /opt
    
  4. Create a desktop file and install it:
    gedit eclipse.desktop
    
    and copy the following to the eclipse.desktop file.
    [Desktop Entry]
    Name=Eclipse 
    Type=Application
    Exec=eclipse
    Terminal=false
    Icon=eclipse
    Comment=Integrated Development Environment
    NoDisplay=false
    Categories=Development;IDE;
    Name[en]=Eclipse
    
    then execute the following command to automatically install it in the unity:
    desktop-file-install eclipse.desktop
    
  5. Create a symlink in /usr/local/bin using
    cd /usr/local/bin
    ln -s /opt/eclipse/eclipse
    
  6. For eclipse icon to be displayed in dash, eclipse icon can be added as
    cp /opt/eclipse/icon.xpm /usr/share/pixmaps/eclipse.xpm
Notice:
I found out that I need to install Java RTE or JDK from Java.com

I wanted to make sure I do not lose it again...

reference:
http://askubuntu.com/questions/26632/how-to-install-eclipse
http://www.eclipse.org/downloads/?osType=linux


Beaglebone Black angstrom

Status Update:
This is a list of working Not working items, so you do not get disappointed after reading the post.  This is  a work in progress...

Angstrom:
GPIO
ADC
I2C1
SPI almost, having some issues with CLK, and Data input output.

ArchLinux:
:-(


First Using angstrom distribution:
opkg is the app-get for angstrom....

Linux beaglebone 3.8.11 #1 SMP Wed May 8 07:34:27 CEST 2013 armv7l GNU/Linux

after opkg update, opkg upgrade
Linux beaglebone 3.8.13 #1 SMP Thu Sep 5 16:35:35 CEST 2013 armv7l GNU/Linux


Install Sudo
opkg install sudo

Network settings:
This post here is great source for setting Static IP
http://derekmolloy.ie/set-ip-address-to-be-static-on-the-beaglebone-black/

add user:
su
useradd xyz-user
passwd xyz-user

Update Time and Time Zone:
rm /etc/localtime
ln  /usr/share/zoneinfo/EST /etc/localtime
/usr/bin/ntpdate-sync 
nano default/ntpdate     to set / enable sync server
date             to check your new time


Using GPIO:
#echo 44 > /sys/class/gpio/export

Reference:
http://www.phys-x.org/rbots/index.php?option=com_content&view=article&id=104:lesson-1-beaglebone-black-blink-led&catid=46:beaglebone-black&Itemid=81
http://www.auctoris.co.uk/2012/08/23/gpio-with-sysfs-on-raspberry-pi-part-2/


Using the I2C:
i2cdetect -y -r 1
root@beaglebone:~# i2cdetect -y -r 1
     0  1  2  3  4  5  6  7  8  9  a  b  c  d  e  f
00:          -- -- -- -- -- -- -- -- -- -- -- -- -- 
10: -- -- -- -- -- -- -- -- -- -- -- -- -- -- -- -- 
20: -- -- -- -- -- -- -- -- -- -- -- -- -- -- -- -- 
30: -- -- -- -- -- -- -- -- -- -- -- -- -- -- -- -- 
40: -- -- -- -- -- -- -- -- -- -- -- -- -- -- -- -- 
50: -- -- -- -- UU UU UU UU -- -- -- -- -- -- -- -- 
60: -- -- -- -- -- -- -- -- -- -- -- -- -- -- -- -- 
70: -- -- -- -- -- -- -- --   

i2cdump -y 1 0x50 w     or
i2cdump -y 1 0x50 b

Link....
http://minix-i2c.blogspot.com/2013/07/using-i2c-tools-with-angstrom-linux-on.html


Using the SPI:
I found the required files in /lib/firmware/ BB-SPIDEV*
all I did finally, is echo this line

root@beaglebone:/lib/firmware# echo BB-SPIDEV0 >  /sys/devices/bone_capemgr.9/slots

Then ls /dev/spi* and here is what I got...

Now what is next? the question is what is really here that works?


Using Analog Inputs:


sh-4.2# echo cape-bone-iio > /sys/devices/bone_capemgr.*/slots
sh-4.2# find /sys/ -name '*AIN*'
/sys/devices/ocp.2/helper.14/AIN0
/sys/devices/ocp.2/helper.14/AIN1
/sys/devices/ocp.2/helper.14/AIN2
/sys/devices/ocp.2/helper.14/AIN3
/sys/devices/ocp.2/helper.14/AIN4
/sys/devices/ocp.2/helper.14/AIN5
/sys/devices/ocp.2/helper.14/AIN6
/sys/devices/ocp.2/helper.14/AIN7
sh-4.2# cat /sys/devices/ocp.2/helper.14/AIN1
OR  
sh-4.2# cat /sys/devices/ocp.2/helper.14/AIN*


References:
http://www.gigamegablog.com/2012/01/29/beaglebone-linux-101-configuring-angstrom-linux/
http://beaglebone.cameon.net/home/reading-the-analog-inputs-adc
http://www.gigamegablog.com/2012/01/22/beaglebone-coding-101-using-the-serial-and-analog-pins/


BeagleBone Black Updating the Software
Getting Started with BeagleBone Black
============================================================
Now, I am trying arch Linux to see if it works better:

http://archlinuxarm.org/platforms/armv7/ti/beaglebone-black


Steps I used:

  1. pacman -Syu
  2. passwd
  3. pacman -S sudo adduser gcc make
  4. adduser username
  5. EDITOR=nano visudo
  6. copy my files


To Setup eth0 configuration Static:
systemctl disable netctl-ifplugd@eth0
cp /etc/netctl/examples/ethernet-static /etc/netctl/ethernet-static
nano /etc/netctl/ethernet-static #edit to you liking
Use /24 for  255.255.255.0
Use /16 for 255.255.0.0
netctl enable ethernet-static
reboot.


References:
http://hipstercircuits.com/enable-spi-1-0-and-1-1-with-device-tre-overlays-on-beaglebone/


References & Commands:
How to auto mount drive at boot...            /etc/fstab   http://www-rohan.sdsu.edu/doc/debian/ch-disks.html
Debian Tutorial http://www-rohan.sdsu.edu/doc/debian/


Thursday, September 5, 2013

Adding GPIO SPI and I2C options to your Arch Linux Kernel

Edit 12/07/2013:
Thanks to Mr. Mauro Ribeiro, I was able to get the SPI on my ODROID-X2 board and, now I will be working on the actual development of the main project, which is, Controlling the world via SPI bus...
Mr. Mauro Ribeiro modified the kernel on https://github.com/hardkernel/linux/tree/odroid-3.8.y
and now we can build kernels with SPI1 enabled.


First lets put some list of GPIOs I used on this board:
105, 102, 110, 117
GPIO are found @
/sys/class/gpio
and then need to export as root...
#echo "105" > export
# echo "102" > export
# echo "110" > export
# echo "117" > export
# echo "out" >  gpio105/direction
# echo "out" >  gpio102/direction
# echo "out" >  gpio110/direction
# echo "out" >  gpio117/direction


# echo "1" > gpio105/value
# echo "0" > gpio105/value
# echo "1" > gpio102/value
# echo "0" > gpio102/value
# echo "1" > gpio102/value
# echo "1" > gpio105/value
# echo "0" > gpio105/value


To read from GPIO that is set as Input:
# echo "in" >  gpio105/direction
# cat /sys/class/gpio/gpio105/value


So, I had to build my Kernel to be able to enable the SPI "I hope that it is going to work..."
Make sure you have at least large SD drive, I used 8 GB and did not work.  So, 16 GB is recommended...

Edit:
OK, my 8GB SD card was not fully used, I had to use gparted and resize the partition to use the full SD card size.

1. Get the source code from the link below, I had to get linux-odroid-3.8.y.zip as others did not have my odroidx2_ubuntu_defconfig configuration file.
https://github.com/hardkernel/linux

2. Now you will have to unzip the file, so crate a folder in your home directory and save the downloaded zip file to it then use
unzip linux-odroid-3.8.y.zip
I installed 7z by using
pacman -S p7zip
Then
7z x -y zip.file.name
You will also need to get
pacman -S base-devel

Also you will need:
pacman -S gcc  make


3. make sure you work from the new created folder, linux-odroid-3.8.y
cd linux-odroid-3.8.y

zcat /proc/config.gz > .config

for Latest SPI enabled configuration, I used the following
make odroidx2_defconfig

4. Run make oldconfig
4. Now, run make menuconfig,  this will allow you to go and enable other options before you build the new kernel

5. make sure you exit and save changes when you are done,  now you should have a .config file in the current folder

6. To start build Run
make -j8
-j8 will allow the make to run up to 8 simultaneous jobs
This part will take a long time so do not set and wait for it to finish

7. Now, Run,
make -j8 modules
sudo make modules_installmake zImage

8.  Rename the current zImage to zImage.prev and copy the new zImage to /boot

kernelversion=`cat ./include/config/kernel.release`
sudo cp /boot/zImage /boot/zImage.prev
sudo cp /boot/uInitrd /boot/uInitrd.prev
sudo cp arch/arm/boot/zImage /boot
sudo cp .config /boot/config-$kernelversion


I used the steps from this location
http://odroid.us/mediawiki/index.php?title=Kernel_compiling
http://forum.odroid.com/viewtopic.php?f=52&t=81

Make sure your time is set to the correct time:
Time-Date set and check
sudo timedatectl set-time "2013-08-14 14:52:00"
timedatectl status
timedatectl set-timezone America/New_York


Warning: you may need to install module-init-tools

Now, Adding more notes about Device Tree overlay:
Install  sudo pacman -S  dtc-overlay
I need to find out where to find the correct dtc files to compile on the Odroid-x2


New Board found:
http://www.variscite.com/products/system-on-module-som/cortex-a9/dart-4460-cpu-ti-omap-4-omap4460?gclid=CJbkwpP3_roCFdF_Qgod0kMAtw

http://armbedded.eu/node/318


resources:
https://github.com/hardkernel/linux
http://archlinuxarm.org/developers/building-kernels
https://wiki.archlinux.org/index.php/Kernel_Compilation#Compilation
http://odroid.us/mediawiki/index.php?title=Kernel_compiling

This is my link to ODROID Forum question:
http://forum.odroid.com/viewtopic.php?f=17&t=1085

Good Links to building kernel:
http://docs.kali.org/development/custom-odroid-kernel-image
https://wiki.archlinux.org/index.php/Kernels/Compilation/Traditional


http://www.egr.msu.edu/classes/ece480/capstone/fall12/group02/documents/Mark-Birdsall_App-Note.pdf


Run Android Jelly Beans on ODROID-X2 Step by Step

After all the problem getting SPI working on the ODROID-X2 Board, I decided to visit the Android world and see what it takes to put it on the ODROID-X2 Board.  And I was so amazed how easy it is...


Android 4.1 Beats-1.6:
http://com.odroid.com/sigong/nf_file_board/nfile_board_view.php?keyword=&tag=ODROID-X2&bid=182

Android 4.1 Beats-1.8 update:
http://com.odroid.com/sigong/nf_file_board/nfile_board_view.php?keyword=&tag=ODROID-X2&bid=192

How to install the update:


Google Apps:
http://goo.im/gapps/gapps-jb-20121011-signed.zip


Building Android Kernel:
http://forum.xda-developers.com/showthread.php?p=38144723

Open source from Samsun:
http://opensource.samsung.com/

Reference to building the Android ODROID-X2 kernel
https://github.com/leekyuhyuk/Odroid-X2-Android-OS-4.1-Kernel
check the readme , build.sh

Reference to Tool Chain download:
http://dev.odroid.com/projects/4412boot/#s-10.1
https://sourcery.mentor.com/GNUToolchain/release1294?lite=arm&cmpid=7108&downloadlite=scblite2012&signature=4-1377441150-0-1ca6798bb3b7e362eb68e47b2522d2d75e2f1f79

Install 32bit libraries on 64bit Linux:
install ia32-libs


Main Source Tree for Hard-Kernel:
http://dn.odroid.com/


Great News/Progress:
After re-building the kernel, and it was finished I found the following:

LD [M]  drivers/spi/spidev.ko
OBJCOPY arch/arm/boot/zImage
Kernel: arch/arm/boot/zImage is ready

So, I know now there are some module I need to load/copy with the kernel
I used the following line to copy my new Android Kernel to the board.
busybox dd conv=notrunc seek=1256960 bs=1 if=/tmp/zImage of=/dev/block/mmcblk0

I built it with built-in instead and now I see spidev in the /sys/class/sysdev and in the sys/modules/spidev  but I am not sure yet how it can be used? or is it working

I need a different option to add spi_master