Monday, November 11, 2013

Debian on ODROID-x2

Edit 12/7/2013:
Thanks to mdrjr Mr. Mauro Ribeiro work and help he was able to edit the kernel build and enable the SPI.

So, here are my notes on this work

OFFICIAL Debian Wheezy for X2

www.mdrjr.net/odroid/debian-wheezy

root/odroid
odroid/odroid

network is configured in
/etc/network/interfaces
####################################################
# interfaces(5) file used by ifup(8) and ifdown(8)
auto lo
iface lo inet loopback

auto eth0
iface eth0 inet static
#your static IP
address 192.168.1.50
#your gateway IP
gateway 192.168.1.1
dns-domain example.com
dns-nameservers 192.168.11.1
netmask 255.255.255.0
#your network address "family"
network 192.168.1.0
broadcast 192.168.1.255
####################################################

You might need to add:
sudo apt-get install libncurses5-dev

Update Date on ODROID-X2 board
data -s "Dec 16 00:00:00 EST 2013"


I did the following steps:
  1. I created a folder in my root home
  2. got the web and get:
  3. wget --no-check-certificate https://github.com/hardkernel/linux/archive/odroid-3.8.y.zip
  4. 7z x -y odroid-3.8.y.zip
  5. cd odroid-3.8.y
  6. sync                    This will sync your SD card
  7. make mrproper
  8. make odroidx2_defconfig
  9. make menuconfig  >>>  this one needed to install sudo apt-get install libncurses5-dev  
  10. now which one I used? odroidx2_ubuntu_defconfig  odroidx2_defconfig
  11. had to install bc first, apt-get install bc
  12. make -j8
  13. sync
  14. make -j8 modules
  15. make  modules_install
  16. sync
  17. kernelversion=`cat ./include/config/kernel.release`
  18. sudo mkinitramfs -c gzip -o ./initramfs-$kernelversion $kernelversion
  19. mkimage -A arm -O linux -T ramdisk -C none -a 0 -e 0 -n initramfs -d ./initramfs-$kernelversion ./uInitrd
  20. cp /boot/zImage /boot/zImage.prevc
  21. cp /boot/uInitrd /boot/uInitrd.prev
  22. cp uInitrd /boot
  23. cp arch/arm/boot/zImage /boot
  24. cp .config /boot/config-$kernelversion
  25. cp System.map /boot/System.map-$kernelversion
  26. sync
  27. shutdown -h 0

And it worked, I am running now using my built kernel...

Edit 12/15/2013:
After the last edit to the kernel to enable spidev1.0 I was able to build the kernel and booting to see the /dev/spidev1.0
the problem is the bottom 1/3 of the monitor is not showing that area and only showing garbage!


Reference:

If you need to use your Odroid as a WiFi Hotspot...
http://forum.odroid.com/viewtopic.php?f=52&t=6282


Sunday, September 22, 2013

Read and Write to ttyS0 serial ports in Linux


Two ways to interface to the ttyS0 serial port:

1)  via terminal command line:

echo "ABCDEF" > /dev/ttyS0
cat /dev/ttyS0


To configure the port:
stty -F /dev/ttyS0 speed 9600 cs8
stty -F /dev/ttyS0 speed 9600 cs8 -cstopb -parenb


2) via C Program: minicom
sudo apt-get install minicom
when done use
sudo minicom -s


3) By writing your own app in C++ or C# or any other preferred Programming language:
I will have some sample working programs here soon.

Saturday, September 14, 2013

Installing Eclipse from the website on Ubuntu 13.04

I found these instructions on one of the websites discussions:

If you've downloaded Eclipse from their official website, follow these steps for the installation.
  1. Extract the eclipse.XX.YY.tar.gz using
    tar -zxvf eclipse.XX.YY.tar.gz
    
  2. Become root.
    sudo -i
    
  3. Copy the extracted folder to /opt
    cp -r eclipse.XX.YY /opt
    
  4. Create a desktop file and install it:
    gedit eclipse.desktop
    
    and copy the following to the eclipse.desktop file.
    [Desktop Entry]
    Name=Eclipse 
    Type=Application
    Exec=eclipse
    Terminal=false
    Icon=eclipse
    Comment=Integrated Development Environment
    NoDisplay=false
    Categories=Development;IDE;
    Name[en]=Eclipse
    
    then execute the following command to automatically install it in the unity:
    desktop-file-install eclipse.desktop
    
  5. Create a symlink in /usr/local/bin using
    cd /usr/local/bin
    ln -s /opt/eclipse/eclipse
    
  6. For eclipse icon to be displayed in dash, eclipse icon can be added as
    cp /opt/eclipse/icon.xpm /usr/share/pixmaps/eclipse.xpm
Notice:
I found out that I need to install Java RTE or JDK from Java.com

I wanted to make sure I do not lose it again...

reference:
http://askubuntu.com/questions/26632/how-to-install-eclipse
http://www.eclipse.org/downloads/?osType=linux


Beaglebone Black angstrom

Status Update:
This is a list of working Not working items, so you do not get disappointed after reading the post.  This is  a work in progress...

Angstrom:
GPIO
ADC
I2C1
SPI almost, having some issues with CLK, and Data input output.

ArchLinux:
:-(


First Using angstrom distribution:
opkg is the app-get for angstrom....

Linux beaglebone 3.8.11 #1 SMP Wed May 8 07:34:27 CEST 2013 armv7l GNU/Linux

after opkg update, opkg upgrade
Linux beaglebone 3.8.13 #1 SMP Thu Sep 5 16:35:35 CEST 2013 armv7l GNU/Linux


Install Sudo
opkg install sudo

Network settings:
This post here is great source for setting Static IP
http://derekmolloy.ie/set-ip-address-to-be-static-on-the-beaglebone-black/

add user:
su
useradd xyz-user
passwd xyz-user

Update Time and Time Zone:
rm /etc/localtime
ln  /usr/share/zoneinfo/EST /etc/localtime
/usr/bin/ntpdate-sync 
nano default/ntpdate     to set / enable sync server
date             to check your new time


Using GPIO:
#echo 44 > /sys/class/gpio/export

Reference:
http://www.phys-x.org/rbots/index.php?option=com_content&view=article&id=104:lesson-1-beaglebone-black-blink-led&catid=46:beaglebone-black&Itemid=81
http://www.auctoris.co.uk/2012/08/23/gpio-with-sysfs-on-raspberry-pi-part-2/


Using the I2C:
i2cdetect -y -r 1
root@beaglebone:~# i2cdetect -y -r 1
     0  1  2  3  4  5  6  7  8  9  a  b  c  d  e  f
00:          -- -- -- -- -- -- -- -- -- -- -- -- -- 
10: -- -- -- -- -- -- -- -- -- -- -- -- -- -- -- -- 
20: -- -- -- -- -- -- -- -- -- -- -- -- -- -- -- -- 
30: -- -- -- -- -- -- -- -- -- -- -- -- -- -- -- -- 
40: -- -- -- -- -- -- -- -- -- -- -- -- -- -- -- -- 
50: -- -- -- -- UU UU UU UU -- -- -- -- -- -- -- -- 
60: -- -- -- -- -- -- -- -- -- -- -- -- -- -- -- -- 
70: -- -- -- -- -- -- -- --   

i2cdump -y 1 0x50 w     or
i2cdump -y 1 0x50 b

Link....
http://minix-i2c.blogspot.com/2013/07/using-i2c-tools-with-angstrom-linux-on.html


Using the SPI:
I found the required files in /lib/firmware/ BB-SPIDEV*
all I did finally, is echo this line

root@beaglebone:/lib/firmware# echo BB-SPIDEV0 >  /sys/devices/bone_capemgr.9/slots

Then ls /dev/spi* and here is what I got...

Now what is next? the question is what is really here that works?


Using Analog Inputs:


sh-4.2# echo cape-bone-iio > /sys/devices/bone_capemgr.*/slots
sh-4.2# find /sys/ -name '*AIN*'
/sys/devices/ocp.2/helper.14/AIN0
/sys/devices/ocp.2/helper.14/AIN1
/sys/devices/ocp.2/helper.14/AIN2
/sys/devices/ocp.2/helper.14/AIN3
/sys/devices/ocp.2/helper.14/AIN4
/sys/devices/ocp.2/helper.14/AIN5
/sys/devices/ocp.2/helper.14/AIN6
/sys/devices/ocp.2/helper.14/AIN7
sh-4.2# cat /sys/devices/ocp.2/helper.14/AIN1
OR  
sh-4.2# cat /sys/devices/ocp.2/helper.14/AIN*


References:
http://www.gigamegablog.com/2012/01/29/beaglebone-linux-101-configuring-angstrom-linux/
http://beaglebone.cameon.net/home/reading-the-analog-inputs-adc
http://www.gigamegablog.com/2012/01/22/beaglebone-coding-101-using-the-serial-and-analog-pins/


BeagleBone Black Updating the Software
Getting Started with BeagleBone Black
============================================================
Now, I am trying arch Linux to see if it works better:

http://archlinuxarm.org/platforms/armv7/ti/beaglebone-black


Steps I used:

  1. pacman -Syu
  2. passwd
  3. pacman -S sudo adduser gcc make
  4. adduser username
  5. EDITOR=nano visudo
  6. copy my files


To Setup eth0 configuration Static:
systemctl disable netctl-ifplugd@eth0
cp /etc/netctl/examples/ethernet-static /etc/netctl/ethernet-static
nano /etc/netctl/ethernet-static #edit to you liking
Use /24 for  255.255.255.0
Use /16 for 255.255.0.0
netctl enable ethernet-static
reboot.


References:
http://hipstercircuits.com/enable-spi-1-0-and-1-1-with-device-tre-overlays-on-beaglebone/


References & Commands:
How to auto mount drive at boot...            /etc/fstab   http://www-rohan.sdsu.edu/doc/debian/ch-disks.html
Debian Tutorial http://www-rohan.sdsu.edu/doc/debian/


Thursday, September 5, 2013

Adding GPIO SPI and I2C options to your Arch Linux Kernel

Edit 12/07/2013:
Thanks to Mr. Mauro Ribeiro, I was able to get the SPI on my ODROID-X2 board and, now I will be working on the actual development of the main project, which is, Controlling the world via SPI bus...
Mr. Mauro Ribeiro modified the kernel on https://github.com/hardkernel/linux/tree/odroid-3.8.y
and now we can build kernels with SPI1 enabled.


First lets put some list of GPIOs I used on this board:
105, 102, 110, 117
GPIO are found @
/sys/class/gpio
and then need to export as root...
#echo "105" > export
# echo "102" > export
# echo "110" > export
# echo "117" > export
# echo "out" >  gpio105/direction
# echo "out" >  gpio102/direction
# echo "out" >  gpio110/direction
# echo "out" >  gpio117/direction


# echo "1" > gpio105/value
# echo "0" > gpio105/value
# echo "1" > gpio102/value
# echo "0" > gpio102/value
# echo "1" > gpio102/value
# echo "1" > gpio105/value
# echo "0" > gpio105/value


To read from GPIO that is set as Input:
# echo "in" >  gpio105/direction
# cat /sys/class/gpio/gpio105/value


So, I had to build my Kernel to be able to enable the SPI "I hope that it is going to work..."
Make sure you have at least large SD drive, I used 8 GB and did not work.  So, 16 GB is recommended...

Edit:
OK, my 8GB SD card was not fully used, I had to use gparted and resize the partition to use the full SD card size.

1. Get the source code from the link below, I had to get linux-odroid-3.8.y.zip as others did not have my odroidx2_ubuntu_defconfig configuration file.
https://github.com/hardkernel/linux

2. Now you will have to unzip the file, so crate a folder in your home directory and save the downloaded zip file to it then use
unzip linux-odroid-3.8.y.zip
I installed 7z by using
pacman -S p7zip
Then
7z x -y zip.file.name
You will also need to get
pacman -S base-devel

Also you will need:
pacman -S gcc  make


3. make sure you work from the new created folder, linux-odroid-3.8.y
cd linux-odroid-3.8.y

zcat /proc/config.gz > .config

for Latest SPI enabled configuration, I used the following
make odroidx2_defconfig

4. Run make oldconfig
4. Now, run make menuconfig,  this will allow you to go and enable other options before you build the new kernel

5. make sure you exit and save changes when you are done,  now you should have a .config file in the current folder

6. To start build Run
make -j8
-j8 will allow the make to run up to 8 simultaneous jobs
This part will take a long time so do not set and wait for it to finish

7. Now, Run,
make -j8 modules
sudo make modules_installmake zImage

8.  Rename the current zImage to zImage.prev and copy the new zImage to /boot

kernelversion=`cat ./include/config/kernel.release`
sudo cp /boot/zImage /boot/zImage.prev
sudo cp /boot/uInitrd /boot/uInitrd.prev
sudo cp arch/arm/boot/zImage /boot
sudo cp .config /boot/config-$kernelversion


I used the steps from this location
http://odroid.us/mediawiki/index.php?title=Kernel_compiling
http://forum.odroid.com/viewtopic.php?f=52&t=81

Make sure your time is set to the correct time:
Time-Date set and check
sudo timedatectl set-time "2013-08-14 14:52:00"
timedatectl status
timedatectl set-timezone America/New_York


Warning: you may need to install module-init-tools

Now, Adding more notes about Device Tree overlay:
Install  sudo pacman -S  dtc-overlay
I need to find out where to find the correct dtc files to compile on the Odroid-x2


New Board found:
http://www.variscite.com/products/system-on-module-som/cortex-a9/dart-4460-cpu-ti-omap-4-omap4460?gclid=CJbkwpP3_roCFdF_Qgod0kMAtw

http://armbedded.eu/node/318


resources:
https://github.com/hardkernel/linux
http://archlinuxarm.org/developers/building-kernels
https://wiki.archlinux.org/index.php/Kernel_Compilation#Compilation
http://odroid.us/mediawiki/index.php?title=Kernel_compiling

This is my link to ODROID Forum question:
http://forum.odroid.com/viewtopic.php?f=17&t=1085

Good Links to building kernel:
http://docs.kali.org/development/custom-odroid-kernel-image
https://wiki.archlinux.org/index.php/Kernels/Compilation/Traditional


http://www.egr.msu.edu/classes/ece480/capstone/fall12/group02/documents/Mark-Birdsall_App-Note.pdf


Run Android Jelly Beans on ODROID-X2 Step by Step

After all the problem getting SPI working on the ODROID-X2 Board, I decided to visit the Android world and see what it takes to put it on the ODROID-X2 Board.  And I was so amazed how easy it is...


Android 4.1 Beats-1.6:
http://com.odroid.com/sigong/nf_file_board/nfile_board_view.php?keyword=&tag=ODROID-X2&bid=182

Android 4.1 Beats-1.8 update:
http://com.odroid.com/sigong/nf_file_board/nfile_board_view.php?keyword=&tag=ODROID-X2&bid=192

How to install the update:


Google Apps:
http://goo.im/gapps/gapps-jb-20121011-signed.zip


Building Android Kernel:
http://forum.xda-developers.com/showthread.php?p=38144723

Open source from Samsun:
http://opensource.samsung.com/

Reference to building the Android ODROID-X2 kernel
https://github.com/leekyuhyuk/Odroid-X2-Android-OS-4.1-Kernel
check the readme , build.sh

Reference to Tool Chain download:
http://dev.odroid.com/projects/4412boot/#s-10.1
https://sourcery.mentor.com/GNUToolchain/release1294?lite=arm&cmpid=7108&downloadlite=scblite2012&signature=4-1377441150-0-1ca6798bb3b7e362eb68e47b2522d2d75e2f1f79

Install 32bit libraries on 64bit Linux:
install ia32-libs


Main Source Tree for Hard-Kernel:
http://dn.odroid.com/


Great News/Progress:
After re-building the kernel, and it was finished I found the following:

LD [M]  drivers/spi/spidev.ko
OBJCOPY arch/arm/boot/zImage
Kernel: arch/arm/boot/zImage is ready

So, I know now there are some module I need to load/copy with the kernel
I used the following line to copy my new Android Kernel to the board.
busybox dd conv=notrunc seek=1256960 bs=1 if=/tmp/zImage of=/dev/block/mmcblk0

I built it with built-in instead and now I see spidev in the /sys/class/sysdev and in the sys/modules/spidev  but I am not sure yet how it can be used? or is it working

I need a different option to add spi_master

Sunday, August 4, 2013

Micro SD Cards Failing within a year of their use

Micro SD Cards are very popular little storage that are on every  phone or media device now.  We store our precious pictures, music, documents , and all types of files.  But, can we really really really trust it?

On my current  cell phone, Samsung Galaxy Note, I had 32GB SanDisk Ultra class 10.  I bought it from Best-buy, so it is not off a XYZ on eBay somewhere in the unknown world.  This Micro SD failed within three months and I had so many pictures and other files on it, I can not really list them.  What happened I am not sure!  I tried everything to recover it or even format it and see if I can reuse it, but, sadly nothing worked with this card.

Today, I just noticed a sd card simple on my other cell phone, Samsung infuse, which had a PNY 16GB class 10 Micro SD card for a while, I think over 6 months, it also failed miserably  and I could not recover anything on it or even format it!!  Now what is going on with these SD cards?  Is it just me or is it PNY brand or what is going on?

I use these cards on a lot of my devices and specially my embedded development systems and I really hate to start distrust these things because I will become very paranoid with all my equipment!!!

Does anyone out there have any opinion or experience with these SD card in general and you want to share your experience?  please, add to this post...

Friday, July 26, 2013

Run arch linux on ODROID-X2 Step by Step

Get the image from Home

http://archlinuxarm.org/platforms/armv7/samsung/odroid-x2

To write the image to your SD card use the following command line
dd if=ArchLinuxARM-2013.07-odroid-x2.img  of=/dev/sdxxxx  bs=10M
Make sure /dev/sdxxxx is the correct dev for your SD card
Make sure to umount your SD card first...
Once dd is done writing the image to SD card use sync to flush any buffers


login using id and password  root/root
you will have to login first time using serial terminal or SSH.

If you can not find the IP address for the ODROID board, then you might want to setup static IP address;
  1. cd /etc/network.d   then type ls , you should see ethernet-eth0
  2. edit the file ethernet-eth0 using  sudo nano ethernet-eth0
  3. comment the dhcp configuration 
  4. un-comment and enter your correct ip address that you want to set and your dhcp address
  5. save and insert the sd card in your board and ping that address
  6. you should get echo back after 10-15 seconds
  7. for some reason it does not pickup the static by it self, I had to use netcfg-daemon start
Copy of my ethernet-eth0
## Change for static
CONNECTION='ethernet'
DESCRIPTION='A basic static ethernet connection using iproute'
INTERFACE='eth0'
IP='static'
ADDR='172.16.71.239'
NETMASK='255.255.0.0'
##ROUTES=('192.168.0.0/24 via 192.168.1.2')
GATEWAY='172.16.1.45'
DNS=('172.16.1225' '172.16.1.233')


OK, this time with "Linux alarm 3.8.13.12-2-ARCH #2 SMP PREEMPT Tue Nov 12 20:41:34 CST 2013 armv7l GNU/Linux" I had to go to /etc/netcfg/ and edit eth0  

escription='A basic static ethernet connection'
Interface=eth0
Connection=ethernet
IP=static
Address=('192.168.71.239/24')
#Routes=('192.168.0.0/24 via 192.168.1.2')
Gateway='192.168.1.1'
DNS=('192.168.1.1' '192.168.1.2')


If you need to change root password,
Type: passwd  after you login and you will be prompted to enter new password.


How to update System in archlinux
We use pacman to install/update the system packages
So, type pacman-key --init to create pacman key first
you might need to switch to another console and type
ls -R / && ls -R / && ls -R /
now, when it is done, type pacman -Syu to update the system
It will take some time and will download and update your system
To add/install packages use pacman -S package_name


How to add your username to suders
Install sudo, modify visudo

  1. Install adduser by using pacman -S adduser
  2. Install sudo to be able to use root privilege
  3. Type  adduser username

and follow/answer all questions, set defaults, set password...
Now we need to edit the visudo to allow new user to use the sudo command
Type
EDITOR=nano visudo
Edit/ uncomment the following line
# %sudo ALL=(ALL) ALL  ==>>   %sudo ALL=(ALL) ALL
save and then create sudo group
groupadd sudo
now add sudo group to your user name
usermod -a -G sudo username
reboot and test your sudo access.  you will need to logout and login again...

Getting the WiFi setup
Setting the WiFi I had to install wicd
sudo pacman -Su wicd
then I got to run ip add show  to see list of your network device eth0, lo, wlan0
I have WEP security so, I run
sudo iwconfig wlan0 essid "your essid here" key your_hex_Keysudo dhcpcd wlan0
Now, if you have different settings like WEP, WPA, WPA2,..  refer to the link here

So, I started investigating netcfg
it works with the profiles saved in /etc/network.d
and by default it has one profile for the ethernet-eth0
so, I copied wireless-wep from the examples folder
updated the parameters in wireless-wep to my wireless network and
type: sudo netcfg wireless-wep -u

Two things:
  1. my key is stored in the profile file in text --- not good
  2. it still does not start on boot .....
I found netcfg-menu that needs dialog..
The netcfg-menu will make it simple to start specific profile as long as you created a profile for it as I have above. but still no auto-start on boot!

What is the /etc/conf.d/netcfg ???
I did it..  in the netcfg file there is a line called NETWORKS that is by default is like this...
NETWORKS=(ethernet-eth0)
So, I added my second profile just like this
NETWORKS=(ethernet-eth0 wireless-wep)
and now, both network profiles are up and running on boot....
Now, I needed to install wicd-gtk to work on the GUI


How to get your HDMI Working:
To be able to login from Arch Linux on a monitor instead of serial port of SSH you need
pacman -Su linux-odroid-x2

Trying to install:
sudo pacman -S xorg-server lxde xf86-video-fbdev
you can add xorg-apps but it is not required
sudo pacman -S xorg lxde xorg-twm xorg-xclock xterm xorg-xinit
All this so far did not get me to boot from the HDMI monitor...??????
After installing an image for Ubuntu 13.04 I got the board to run on HDMI interface and I logged in.  so it is not a hardware issue, it is a configuration.

> create file ~/.xinitrc in your home directory and add this line to it
exec startlxde
> there was an error not finding a cache file and I had to create it manually
OK, the file name was cookie and this is what I did
cd .config/pulse
echo > cookie
The echo command created a file cookie then I had to use nano and add the line I mentioned above
Now you should be able to use startx and get your LXDE desktop

Had to install fbset and run sudo fbset -fb /dev/fb1
Edited /etc/X11/xorg.conf

Section "Device"
        Identifier "HDMI"
        Driver  "fbdev"
        Option  "fbdev"           "/dev/fb1"
EndSection
Section "Screen"
        Identifier   "Default Screen"
        Device       "HDMI"
        DefaultDepth 24
EndSection
Section "DRI"
        Mode 0666
EndSection

after I added these settings to xorg.conf file it worked and I logged to LXDE finally....


To be able to forward X11 windows I had to do:
I am not sure yet which one did the trick but I will have to do this again on my other board...

  • Enable the AllowTcpForwarding option in sshd_config on the server.
  • Enable the X11Forwarding option in sshd_config on the server.
  • Set the X11DisplayOffset option in sshd_config on the server to 10.
  • Enable the X11UseLocalhost option in sshd_config on the server.
Also:
  • Enable the ForwardX11 option in ssh_config on the client.
  • Enable the ForwardX11Trusted if gui is drawing badly.
You need to restart the ssh daemon on the server for these changes to take effect, of course.
To use the forwarding, log on to your server through ssh:


Time-Date set and check
sudo timedatectl set-time "2013-08-14 14:52:00"
timedatectl status
timedatectl set-timezone America/New_York


Scratch Pad:
Do not use this method use adduser better
If you need to add new user so you do not login with the root
Type:     useradd user_name
Then change password:  passwd user_name
where user_name is the new user name you want to create

You will need to install sudo to be able to use root privilege with your new user id


Commands you might need:
Check CPU usage    top
Check SD usage       df  -h
systemctl start sshd
systemctl enable sshd.service
systemctl restart sshd.service


List to Do:
sudo root access
WiFi
HDMI
GPIO
SPI
Bluetooth
ssh -X ip-address


References:
https://wiki.archlinux.org/index.php/Wireless_Setup
https://wiki.archlinux.org/index.php/Bluetooth
https://wiki.archlinux.org/index.php/Ssh#X11_Forwarding
https://wiki.archlinux.org/index.php/Running_X_apps_as_root  Running X apps as root


list of stuff I did on new ArchLinuxARM-2013.11:

  1. login as root/root
  2. pacman -Syu
  3. pacman -S sudo adduser
  4. adduser username
  5. EDITOR=nano visudo
  6. Created new sudo group and added to new username
  7. Log in with new username
  8. Tested new username sudo
  9. If you do too much sudo, you can use sudo -s
  10. I kept the IP to DHCP, and on my second board, I changed it to Static
  11. change IP to static follow steps above...
  12. trying to install lxde
  13. sudo pacman -S xorg lxde xorg-twm xorg-xclock xterm xorg-xinit
  14. created .xinitrc and added exec startlxde
  15. Added pulse folder in .config and then created empty cookie file
  16. Install fbset then run sudo fbset -fb /dev/fb1
  17. created file /etc/X11/xorg.conf then copied the data above to it


Saturday, July 6, 2013

How to get Ubuntu to play Amazon instant Movies

I finally got to try Amazon Prime membership and started to use the futures including free shipping on some of the items listed, and play the instant movies that will work only on some of the Operator Systems.

What a disappointment, it does not work on all the Android devices that I have, however, it works on
Amazon Kindle!!!  I thought that that runs a version of Android too, so why not the rest of Android devices?

I found a fix on here though...
you will need to download the Free flash player APK from here


Now, my Ubuntu can not stream these movies, Why?
Here is fix:

sudo mkdir /etc/hal/fdi/preprobe

sudo mkdir /etc/hal/fdi/information

/usr/sbin/hald --daemon=yes --verbose=yes

rm -rf ~/.adobe


References:
http://askubuntu.com/questions/286297/is-there-a-work-around-to-get-protected-hulu-or-amazon-prime-instant-videos-work

http://forum.xda-developers.com/showthread.php?t=1774336

Monday, July 1, 2013

How tos in MS Windows to develop your application peacefully

I wanted to capture all the tools and tricks that I was able to find after a long research and reading.  This way I can come back here and reuse it or someone else can find it.

Command Line Commands that solved my problems:

To Enable Remote Desktop:
reg add "HKEY_LOCAL_MACHINE\SYSTEM\CurrentControlSet\Control\Terminal Server" /v fDenyTSConnections /t REG_DWORD /d 0 /f

To Disable Remote Desktop:
reg add "HKEY_LOCAL_MACHINE\SYSTEM\CurrentControlSet\Control\Terminal Server" /v fDenyTSConnections /t REG_DWORD /d 1 /f


Task List / Kill:
taskkill -pid 4104
taskkill -im iexplore.exe
tasklist -m
tasklist -svc


Some references:

Monday, May 20, 2013

Interfacing to the PandaBoard GPIO, SPI, etc...


Here is my experience/adventure with PandaBoard trying to use its SPI, GPIO interfaces.
This is a work in progress so, I am documenting as I progress.

GPIO are found @
/sys/class/gpio
and then need to export as root...
#echo "50" > export
# echo "39" > export
# echo "38" > export
# echo "37" > export
# echo "out" >  gpio51/direction
# echo "out" >  gpio50/direction
# echo "out" >  gpio39/direction
# echo "out" >  gpio38/direction
# echo "out" >  gpio37/direction

# echo "1" > gpio38/value
# echo "0" > gpio38/value
# echo "1" > gpio38/value
# echo "0" > gpio38/value
# echo "1" > gpio38/value
# echo "1" > gpio37/value
# echo "0" > gpio37/value


To read from GPIO that is set as Input:
# cat /sys/class/gpio/gpio34/value

I will need to use 
chmod 666 /sys/class/gpio/gpio38/value
OR
Change the rc.local  

Now, How do I do this from C program:
This file will show in details how to do all the above from C program.
Note: You will have to run this program using sudo ./Test_IO_1 until I find how to create the GPIO on boot and make it accessible to all users
Makefile
Test_IO_1.c
I included the Makefile so you can compile the C program.  I compiled the code natively, which is on the Pandaboard itself.

  1. Make a folder, Test_IO_1
  2. Copy these two files to the new folder
  3. run make
  4. you should have Test_IO_1.0 and Test_IO_1
  5. type sudo ./Test_IO_1
  6. monitor GPIO38 with a scope, multimeter or a LED

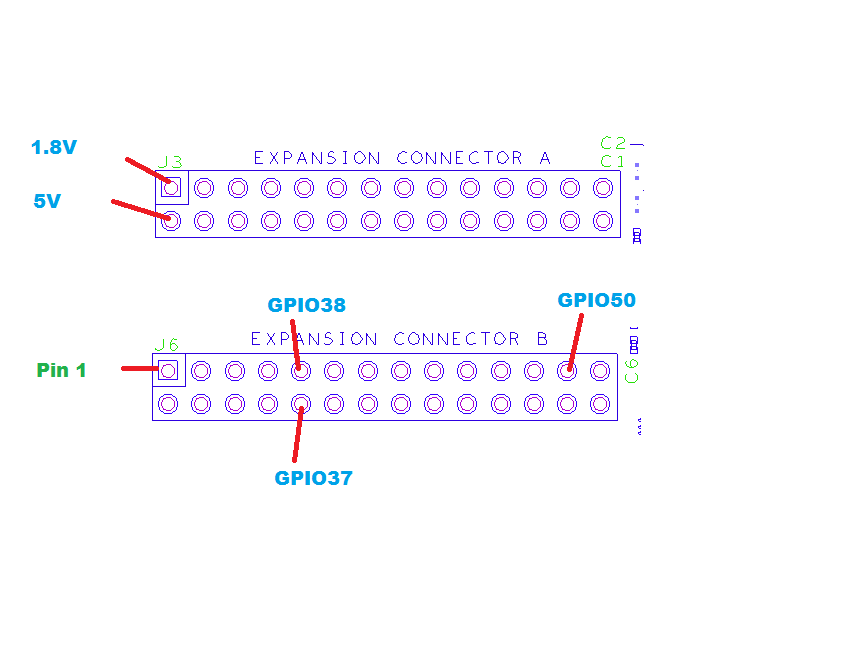
Use this image or PandaBoard datasheet to find the correct pin for GPIO38

Open a file-socket to read or write from /sys/class/gpio/gpio38/value

To Read:
rewind(fp);
fread(&read_value, sizeof(char), 1, fp);

To Write:
rewind(fp);
fwrite(&set_value, sizeof(char), 1, fp);


OK, How to modify device read/write permission on boot:
I found this tile /etc/mtab
is this the one?


Also, I found SPI stuff @
/sys/class/spi_master
There is spi1, spi2, spi3, spi4


References:
http://lxr.free-electrons.com/source/Documentation/gpio.txt
http://www.haifux.org/lectures/258/gpio_spi_i2c_userspace.pdf


https://www.kernel.org/doc/Documentation/spi/spi-summary


http://www.youtube.com/watch?v=fuEB0VCkslQ
http://comments.gmane.org/gmane.comp.embedded.pandaboard/9743
http://lxr.free-electrons.com/source/drivers/input/keyboard/gpio_keys.c


http://lxr.free-electrons.com/source/arch/arm/mach-u300/spi.c?v=2.6.34
http://elinux.org/BeagleBoard/SPI

http://www.egr.msu.edu/classes/ece480/capstone/fall12/group02/documents/Mark-Birdsall_App-Note.pdf


Wednesday, May 15, 2013

Run archlinux on PandaBoard Step by Step

Working on installing archlinux on my PandaBoard I found this site with great information,
Archlinux ARM


But, I had to do a lot of research to find more stuff I needed to actually follow these instructions.
So, I decided to document all that and add a little more to help others if they needed.  So, this is a work in progress and will be updated as I work and add to my PandaBoard.

I am running this process on Ubuntu 13.04...

You need to get these packages
PandaBoard Bootloader Tarball   will be extracted in the FAT partition
Root Filesystem Tarball                will be extracted in the ext3 partition

Use the script provided by archlinuxarm.org xmkcard.sh from the bootloader tarball to partition and format the SD Card.
You need to make the script file executable
chmod +x xmkcard.sh

Make sure you find out the name of the SD card in the dev folder
ls /dev/sd*
ls /dev/mmc*

and you can also use mount to see what name it has when it was mounted

Now you can run
sudo ./xmkcard.sh /dev/sd_name

You need to expand the two tarballs, downloaded above, one to the FAT and the other one to the ext3
Wait:
To extract the files you will need to use this command
tar -zxvf  filename.tar.gz

And you need to be root, not sudo as some files need to be created as part of the filesystem and you have to be root.

So, recent releases of Ubuntu come with root account disabled, to enable it
sudo passwd root
This will enable the root account and will ask you to set a password

and if you want to disable the root account

sudo passwd -l root

About creating boot.scr file:
This one you will need to have mkimage executable and I am still looking for it...
So, I found out that you need to install uboot-mkimage

sudo apt-get install uboot-mkimage

Now you should be able to create the boot.scr file use this command for reference
First, Create a file bootcmd  and add this to it
fatload mmc 0 0x80300000 uImage setenv bootargs console=ttyO2,115200n8 noinitrd init=/sbin/init root=/dev/mmcblk0p2 rootwait rw loglevel=8 bootm 80300000

Then type this command:
mkimage -A arm -O linux -T script -C none -a 0 -e 0 -n "PandaBoard boot script" -d bootcmd boot.scr

And now, you should have the boot.scr file in the same folder of the bootcmd file, move it to the FAT partition.


Now, take your SD Card and plug it into the PandaBoard and power it up:
Make sure you connect a serial cable to the DB9 connector for output and you will see and be able to login via the terminal if you needed to, I will include a text file with a capture of all text output

PandaBoard_Debug_Out.txt


First thing you will need is to login,
username is : root
password is: root

If you need to change root password,
Type: passwd  after you login and you will be prompted to enter new password.
If you need to add new user so you do not login with the root
Type:     useradd user_name
Then change password:  passwd user_name
where user_name is the new user name you want to create

You will need to install sudo to be able to use root privilege with your new user id

How to update System in archlinux
We use pacman to install/update the system packages
So, type pacman-key --init to create pacman key first
you might need to switch to another console and type
ls -R / && ls -R / && ls -R /
now, when it is done, type pacman -Syu to update the system
It will take some time and will download and update your system
To add/install packages use pacman -S package_name

How to add your username to suders
Install sudo, modify visudo

  1. Install adduser by using pacman -S adduser
  2. Type  adduser username

and follow/answer all questions, set defaults, set password...
Now we need to edit the visudo to allow new user to use the sudo command
Type
EDITOR=nano visudo


Change hostname
Hostname is stored in the /etc/hostname file
type
sudo nano /etc/hostname
Then edit the name to the one you prefer, save and exit
Now, you will need to edit the hosts file in the same directory
sudo nano /etc/hosts
edit the like that starts with 127.0.0.1 localhost.localdomain localhost
and add your new hostname to the end
127.0.0.1 localhost.localdomain localhost New-Hostname

Install Xserver
sudo pacman -S xorg lxde xorg-twm xorg-xclock xterm xorg-xinit
> create file ~/.xinitrc in your home directory and add this line to it
exec startlxde
> there was an error not finding a cache file and I had to create it manually
OK, the file name was cookie and this is what I did
cd .config/pulse
echo > cookie
The echo command created a file cookie then I had to use nano and add the line I mentioned above
Now you should be able to use startx and get your LXDE desktop


List of items to add:
system update
network
keep boot messages on display


For reference:
Use e2label /dev/sdx1 label_name to change your partition label
Use mkfs.ext3 /dev/sdc2 to format ext3 your partion
to view your board IP address use ip add show

OK, for administration stuff:
these are files I will need to know what they do...
login.defs           login and account information
mtab
iftab                 something with network
fstab


Creating boot scripts:
/etc/profile.d/locale.sh   works, but permission denied!!!


References Used:
Archlinux ARM

http://elinux.org/ArchLinux_Install_Guide
https://wiki.archlinux.org/index.php/Beginners'_Guide


https://wiki.archlinux.org/index.php/LXDE

https://wiki.archlinux.org/index.php/Bluetooth
https://wiki.archlinux.org/index.php/Wireless_Setup


Friday, May 3, 2013

How to Auto scroll TextView Android Java

I listed how to auto-scroll text containers in C# while ago, and now that I am developing other applications for Android, I needed to do the same for the following:

TextView:
Rx_text is a TextView Container.  and O_Text is a variable of type String


Rx_text.append(O_Text);
Rx_text_scroll_view.scrollTo(0, Rx_text.getBottom());


Thursday, May 2, 2013

How to Auto scroll TextBox, ListBox, ListView C# C-Sharp


Programming In C# with Visual Studio


Sometimes you need to add this little trick in your code to ease using it. this trick is to force the TextBox, ListBox, ListView, or DataGridView to scroll down to the last item was entered.


Here are some info on how to do an Auto-scroll for your program controls

TextBox auto-scroll

textBox1.SelectionStart = textBox1.Text.Length;
textBox1.ScrollToCaret();

ListBox auto-scroll

listBox1.SelectedIndex = listBox1.Items.Count - 1;
listBox1.SelectedIndex = -1;

ListView auto-scroll

listView1.EnsureVisible(listView1.Items.Count - 1);TreeView autoscroll
treeView1.Nodes[treeView1.Nodes.Count - 1].EnsureVisible();

DataGridView auto-scroll

dataGridView1.FirstDisplayedCell =
dataGridView1.Rows[dataGridView1.Rows.Count - 1].Cells[0];

Monday, April 22, 2013

Disable Guest Account in Ubuntu

Ubuntu fresh installations have the guest account enabled by default.  This caused me few problem already and not really happy about it.  So, after searching and learning about this I found that there is a simple solution for it.

Start a terminal session using Alt+Ctrl+t or any other way you know,
in the terminal type the following

gksudo gedit /etc/lightdm/lightdm.conf

This command will open gedit editor with the file lightdm.conf for editing
Also, it will require root access, so your account must be in the sudoers account.
Now add the following line to the lightdm.conf file

allow-guest=false

This line will disable the guest account on this computer.
Then you should restart the lightdm using this command

sudo restart lightdm

This process is very well everywhere on the internet if you search for it, but, I like to add my own to make it easier to find and track later.


Thursday, March 14, 2013

Spartan-6 Clock Multiplier / Divider using PLL DCM

I started using Spartan-6 FPGA couple of weeks ago.  Going back to my old VHDL coding to be able to work on a custom application.
I needed to divide my input 100MHz CLK to run a task at 33MHz.  I know I should be able to do that with the PLL/DCM built in the Spartan-6.  But, I can not find any reference code to show what/how is this done in code.  How can I configure the PLL registers to divide/multiply and what is the labels I will be using to trigger to my task.

If someone out there able to explain that, I really would appreciate a lot.

Saturday, March 9, 2013

FPGA SPARTAN-2 XC2S200 Tools

I am going back to my Digilab 2 FPGA Board that has Spartan-2 FPGA from Xilinx for a small project and proof of concept, but for my surprise, the new ISE Webpack from Xilinx does not support this chip anymore.  And, of-course, Digilent does not support it either,   is it discontinued board.  So, now what should I do?

I know this board is more than enough for what I am working on.  I got another board Nexys-3 that has Spartan-6 and it works so far great, but, is the Spartan-2 really un-usable now?  or, is someone out there can guide to and point me to a tool that I can use to program it with?

I am going to work on this task and try to see what I can do and find...

Friday, January 18, 2013

Android Development How to Set Focus

You ever need to set focus for a control on your GUI.
You could design a GUI interface for your Android application but, you need to set the focus to one specific control on start-up.  In this example I am using a Button control for that.  You have two options, option one: add the focus option in the xml file that describes your GUI, or option two: add the code that does the same thing in option one but can be used in run time instead of only once on start-up.

Option One:
Add this part to your xml GUI file


<Button
android:id="@+id/open_bt"
android:layout_width="wrap_content"
android:layout_height="wrap_content"
android:text="@string/open_comm"
android:onClick="onClick"
android:focusableInTouchMode="true"
>
<requestFocus/>
</Button>


Option Two:
Add this to the Activity module:

static Button Open_Button;

Open_Button = (Button) findViewById(R.id.open_bt);

Open_Button.setFocusableInTouchMode(true);
Open_Button.requestFocus();


More information will be added, and screen shots...