Saturday, July 23, 2016

Connect Raspberry Pi to Hidden SSID

I needed to connect my Raspberry Pi to a hidden SSID, and I did it using the following steps and resources...
These are the steps I followed to get my Raspberry Pi to see my hidden SSID.


Install iwlist

sudo iwlist wlan0 scan essid *yourSSID*

once you see the network Access Point, go to your wifi and find it listed, add it and enter your password/key


now, you are connected.


If you are working from the console screen and do not load Xwindow...

sudo nano /etc/network/interfaces

Edit the file and add/update these informaiton

allow-hotplug wlan0
auto wlan0
iface wlan0 inet manual
    wpa-conf /etc/wpa_supplicant/wpa_supplicant.conf
Now, you need to edit this file
 sudo nano /etc/wpa_supplicant/wpa_supplicant.conf
Enter/Add the ssid information

network={
        ssid="ssid-name"
        psk="ssid-password"
        key_mgmt=WPA-PSK
}
For key_mgmt, you need to find out what type it is, usually it is WPA-PSK

Reference:
https://www.raspberrypi.org/forums/viewtopic.php?&t=37119


Thursday, April 7, 2016

Raspberry Pi 3 How to Use Serial Port

Here is my work summery on the Raspberry Pi 3.  As I start working on it and putting it all together, this efforts are made to collect all the information I need, it is wise to save all my work notes.

So, first of all you should have the following items on your desk to start working on the Raspberry Pi:
I like this image from Element 14 Community.


I am done writing all the drivers and some apps that use I2C, SPI, GPIO, and other resources on the board. so, I will be updating this page soon.

Setting up the RaspberryPi:
to start here is the ID and password for the default user
ID: pi
Password: raspberry


Serial port:
So, on the Raspberry Pi 3 and other too, the serial port is used for the consol out put.  that is not going to work if we are trying to use it for our designs.  So, the first thing is to stop the consol from writing to the port and freeing it for us to use.
In Raspberry Pi there is a tool called Raspberry Pi Configuration.  you can start this tool by clicking Menu-> Preference, then Raspberry Pi Configuration.
Now, in the second tab, Interfaces, click on disable next to Serial.  Clock OK and restart the Pi.

Important:  Serial port on Raspberry Pi 3 is called /dev/serial0.  So if you try to use the /dev/ttyAMA0 or any other name it will not work.

Using minicom or potty applications you can test port
connect pin GPIO14 and GPIO15 to make a loop back, so if you type any character in the terminal you should see it.  If the connection between GPIO14 and GPIO15 is missing you should not see any characters on the screen.

Sample code to use to configure/interface to the serial port:


Saturday, May 9, 2015

Raspberry Pi How to


Here is my work summery on the Raspberry Pi.  As I start working on it and put it all together, this efforts are made to collect all the information I need, it is wise to save all my work notes.

So, first of all you should have the following items on your desk to start working on the Raspberry Pi:
I like this image from Element 14 Community.


I am done writing all the drivers and some apps that use I2C, SPI, GPIO, and other resources on the board. so, I will be updating this page soon.

Setting up the RaspberryPi:
to start here is the ID and password for the default user
ID: pi
Password: raspberry


GPIO:
There are at least two options to work with GPIOs. One is mapping a pointer to the GPIO registers and using that to manipulate IOs. Two is to use file system by opening the proper file and manipulating that.

Note:
There is a change on Raspberry pi 2 that affected the addressing of GPIO address, originally the following mapping was used on the Raspberry pi
#define BCM2708_PERI_BASE        0x20000000   
#define GPIO_BASE                (BCM2708_PERI_BASE + 0x200000)  
/* GPIO controller */

the following change will be used to map to the new Raspberry pi 2
#define BCM2708_PERI_BASE        0x3F000000  
#define GPIO_BASE                (BCM2708_PERI_BASE + 0x200000) 
/* GPIO controller */


I2C:

Will need to install:
sudo apt-get install libi2c-dev
sudo apt-get install i2c-tools

Then you will be able to run:
sudo i2cdetect -y 1
i2cget
i2cset

Now, How to read/write to I2C:


SPI:
Great news, SPI is functioning now, I am working on learning more about the process and customizing the code to work with my need as a general SPI master that can communicate with different SPI resources.


Read and Write files on micro SD Card
You can read/write files on the SD card or on a mounted USB Flash drive.
to do, you need to know first the mount point for this device.


Sound:


How to sync time with NTP server on login:
We need to edit the NTP time server list.
well, the command is
ntpdate ntp_server_address
but, I found out on the Rasspberry pi I get this message
the NTP socket is in use, exiting
So, I need to do this
sudo service ntp stop
sudo ntpdate ntp_server_address
sudo service ntp start
and now it works just fine....
You can test to see if ntpd is running,
ntpd -p
Also, need to select your proper time zone:
need to remove the timezone file first
rm localtime
now link to the correct file for your time zone
cd /etc
ln -s /usr/share/zoneinfo/US/Eastern localtime
Now when you sync it will show the correct time for your zone.


Start App automatically on boot:

to be able to run a script automatically after login, we need to edit the following file
sudo nano /etc/profile
then add the executable at the end of this file such as the commands needed to automatically execute ntp sync at login
sudo service ntp stop
sudo ntpdate ntp_server_address
sudo service ntp start

There is also cron:
cron is a software utility that is time based to run scripts in a Linux like environment.
crontab is cron table that contains all these scripts
a link is provided to read more about cron on Wikipedia web site, very good information


Bluetooth management:
Some more details to be added here once I am finished with it...


Links to resources:


http://askubuntu.com/questions/244526/unable-to-synchronize-time-using-ntp

http://www.opentechguides.com/how-to/article/raspberry-pi/5/raspberry-pi-auto-start.html

http://en.wikipedia.org/wiki/Cron

How to configure your Raspberry pi WiFi and Bluetooth

Saturday, March 14, 2015

Install MplabX On Linux Ububtu 64 Bit

Searched so many answers every time I re-install my Ubuntu, here it is so I never forget or search again,


This is to install the 32bit libraries.  we need these to run MplabX.
sudo apt-get install libc6:i386 libx11-6:i386 libxext6:i386 libstdc++6:i386 libexpat1:i386
Also, we need to install Java SDK or RTE.  Openjdk...
sudo apt-get install openjdk-8-jre  openjdk-8-jdk
Also, I need to mention how to wire the ICD3 to connect to flat connector that would work with PICKIT3.
These are the Pins/Wires Order and numbers:

  1. Blue
  2. Yellow
  3. Green
  4. Red
  5. Black
  6. White


Reference:
http://blog.laczik.org/microchip-mplabx-installation-on-64-bit-ubuntu-system/
http://www.electronic-products-design.com/resources/customer-guides/manufacturing/ibex-microchip-icd2-programming-cable

Wednesday, March 11, 2015

UserControl What a Wonderful Future in C# C-Sharp You should be using

Working on a big project that contains a lot of functionality, modules and futures really gets stressing and gets out of control.  So the best approach is to divide code into modules and structure them to be unique and reusable.


The following is a screen shot or the main application I put together for the example purpose.  It contain a text  box that is displays all output logs.
You can send text logs from "Add Text Test" command button,
you can also, type specific text in the two text boxes and send them to the Output Log Text box.


 I created this user control, a text box and a command button that can be used to type in your text log and press the button to update/send to the main Output Log text box.


Overall Concept

The idea, is when creating main application GUI, you create new user control that can be used later and almost standalone. So it is self contained and can be reused.
The following diagram shows an application that has a text control and three other control groups that consists of a text entry and a command button.
these command buttons can be used multiple times in the same application with different needs and functionality.


The first goal is to create the control group and define events and properties you need to use for this user control. In the user control we using there are:
  • Event that occurs when user clicks on the Command button
  • Properties related to the Text Entry
    • Set: modify the contents of the Text Entry
    • Get: read the contents of the Text Entry
Command Button Events are handled as follow:
  1. User Control Class:
    1.  Add new public delegate 
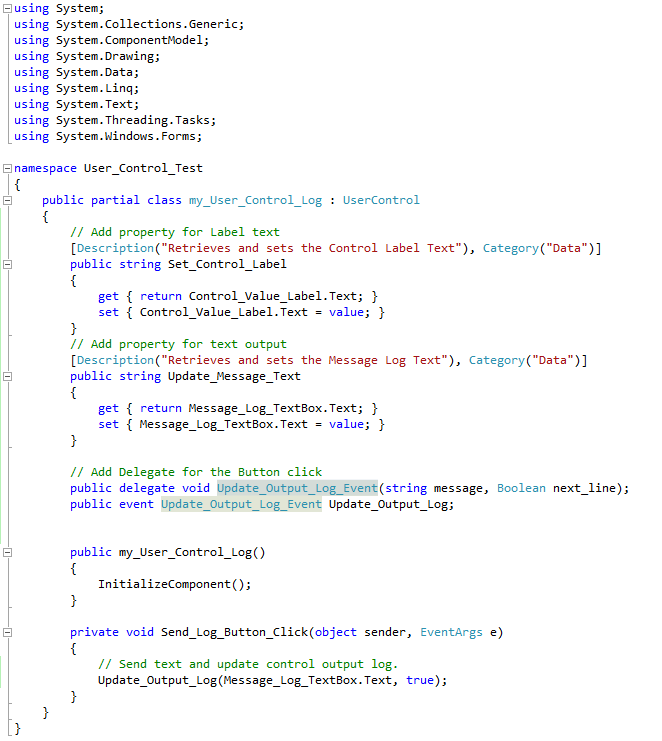
      • public delegate void Update_Output_Log_Event(string message, Boolean next_line);
    2.  Create new event of same delegate type 
      • public event Update_Output_Log_Event Update_Output_Log;
    3. In the button click add a call to that event
      • Update_Output_Log(Message_Log_TextBox.Text, true);
  2. Main Application Class
    1. Add the User Control to the GUI of the main form
      • I will rename it my_User_Control_Log1
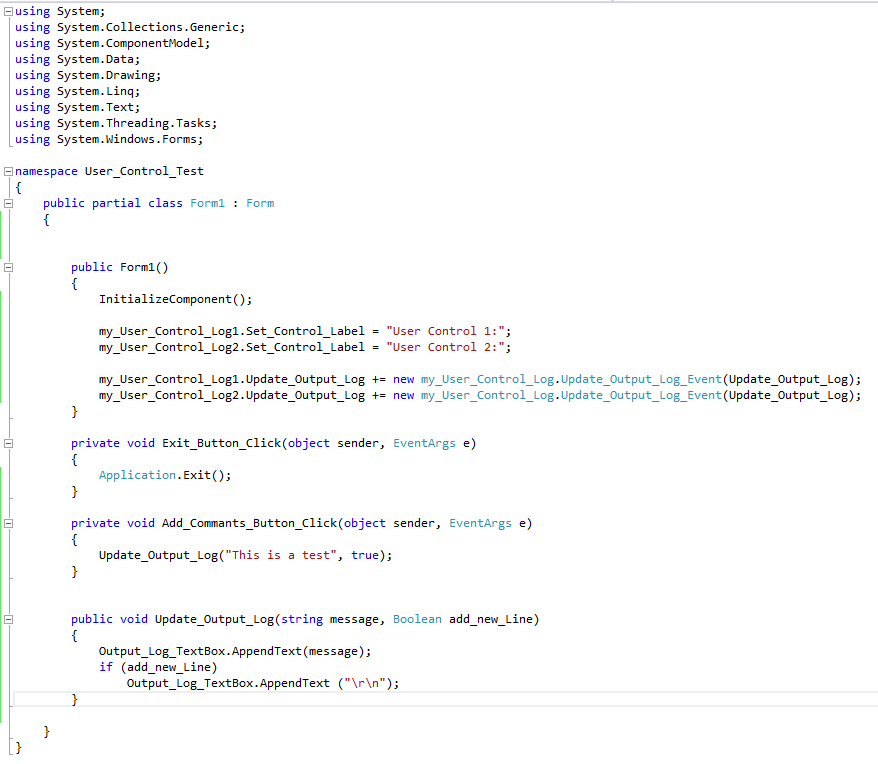
    2. Create function that has the same parameters as the delegate in User Control
      • public void Update_Output_Log(string message, Boolean add_new_Line)
    3. Register the event to the new function
      • my_User_Control_Log1.Update_Output_Log += new my_User_Control_Log.Update_Output_Log_Event(Update_Output_Log);


Properties are handled as follow:


  1. User Control Class:
    1. Add description and category to make it look nicer!
      • [Description("Retrieves and sets the Message Log Text"), Category("Data")]
    2. Create new variable that represents the data type we need to access
      • public string update_Messsage_Text
    3. Add get and set properties for that variable
      • get { return Message_Log_TextBox.Text; }
      • set { Message_Log_TextBox.Text = value; }
      • These two properties will modify/read from the Text Box Message_Log_TextBox.Text
  2. Main Application Class:
    1. when needed you can set or get text values using the following
    2. Output_Log_TextBox.AppendText(my_User_Control_Log1.Update_Message_Text);
    3. my_User_Control_Log1.Update_Message_Text = "Test New Text...";


Here are all the details on how to do that step by step...


Saturday, March 7, 2015

Linux Copy Files Remotely Over SFTP

Using ssh between systems running Linux and always in need to transfer files back and force...?
Then you should consider using sftp as you will be able to copy files so easy unless you use a GUI application to click, click, click, which is OK and nothing wrong with that.  But, for me I like to feel the move and be in control...

So, sftp has the same commands almost as ssh that connects you to your remote PC.  However, it also has the commands that can run on your local PC.  So, after you login to your remote session, all sftp commands you type should run on your remote session,

If you type ls, then you are listing all commands in your remote session.
Now, type
lls
and you see list of all files in local folder you started from


If you type

  • mkdir xyz   you created folder in your remote PC

now type

  • lmkdir xyz  and you created folder in your remote PC


If you type:

  • pwd  you will list current working directory on remote PC

now type

  • lpwd  you will see your current working directory on local PC


Here are some useful commands that I need to use all the time


  • put puts files from your local working directory to the remote directory
  • get gets files from your remote directory to local directory


All following commands work on remote PC and when you add l, that is lower case L, you run them on local PC

  • lls, ls
  • lpwd, pwd
  • lmkdir, mkdir


Sunday, February 22, 2015

CMIS102 Class Resources

I thought it would be easier to gather all the resources and links I use in my CMIS102 class and post them on one location.  This will be very useful in keeping track of all these resources, updating them and providing only one link to all my students.

Links to Online Compilers IDEs:
http://www.tutorialspoint.com/compile_c_online.php
http://cpp.sh/
https://ideone.com/


Links to Online Flow Chart applications:
https://www.lucidchart.com
www.draw.io


Links to C Coding Resources and Examples:
http://www.programiz.com/c-programming/c-string-examples    String Examples
http://www.programmingsimplified.com/c-program-examples    More programming examples
http://www.programiz.com/c-programming/c-strings                   MOre reference to String Capture


YouTube list of videos:
Introduction to Flowchart